Gas station - Prop Pass - 08

Work In Progress / 19 August 2024

Hey Everyone, 

I was out of work for a couple of months, which allowed me to spend some time working on this project. I had a lot of general props to create, so this was a great time to crank these out and focus on finishing the project. 

The first asset I worked on was some vents and aircon units that would go on the top of the gas station. Games like Wolfenstein and Fallout inspired these, and some awesome high poly work was done for these games. 

This is the high-poly work I did for these props. I tried to create an interesting and functional design and shape based on real references. 

Here is a quick pass on the texturing for these

This vent was inspired by one of the designs from Dex Diner in Star Wars. They had a cool-shaped roof vent, but it's very hard to tell the detail as it's only in one shot in the movie. So, I took some artistic license and tried to add detail that matched the look of my vents from above. I even reused a section of the wall vent to better connect these. 


Here is how it matched the building shape in the game. I added metal trim around the edges to fit it properly with the building. I always try to find opportunities to do this to avoid meshes looking jammed together. 


Next, I mostly cranked out a few props that needed making for the Gas station. These were all made for Nanite, so the details are modelled where appropriate. I did a quick Zbrush pass for the cone to bend the plastic to give that used look. 

The oil drum was sculpted and then dynameshed down to form the geo. I added a label on top with a masked alpha to make the edges of the label. 


I modelled the vents on the side with radiators inside to give depth for the ice storage. The ice font was a paid-for font I used in Painter, which saved a lot of time when texturing.

These are all pretty straightforward props. The only noteworthy points are there are quite a few modelled bits, such as screw bolts, hinges and cut-in holes on the signs. As the meshes are all nanite, I can add that extra geo but still keep the models pretty low in detail. I mostly have to think about the texel space these elements take up. My rule is that if something becomes too complex or fussy, uses too much UV space, and is under 10cm in depth, it can sometimes be easy to bake these down to a normal map. Many of these props don't use a normal; if they do, it's more material-level-based. 

I used a combination of scans from the Megascan library and some sculpted meshes for these cardboard boxes. I reused a lot of the geo from the scan but did a clean-up pass to remove crunchy detail on the edges and then retextured them in Painter, so the meshes sat a lot better with all my hand-crafted work. This is a great example of how you can benefit from a tool like Megascans but edit the work to sit better in your art direction. 

I made these two pricing signs. The pricing and signage are created as floating planes or geo on top. 

For these telegraph poles, I made a couple of different modular variants. I also made a Blueprint following a tutorial allowing the cable to snap between two points. This means the poles automatically create the cables and update as you move them around. I also created other cables with gravity and weight in the scene. So, it's quite a versatile tool. 

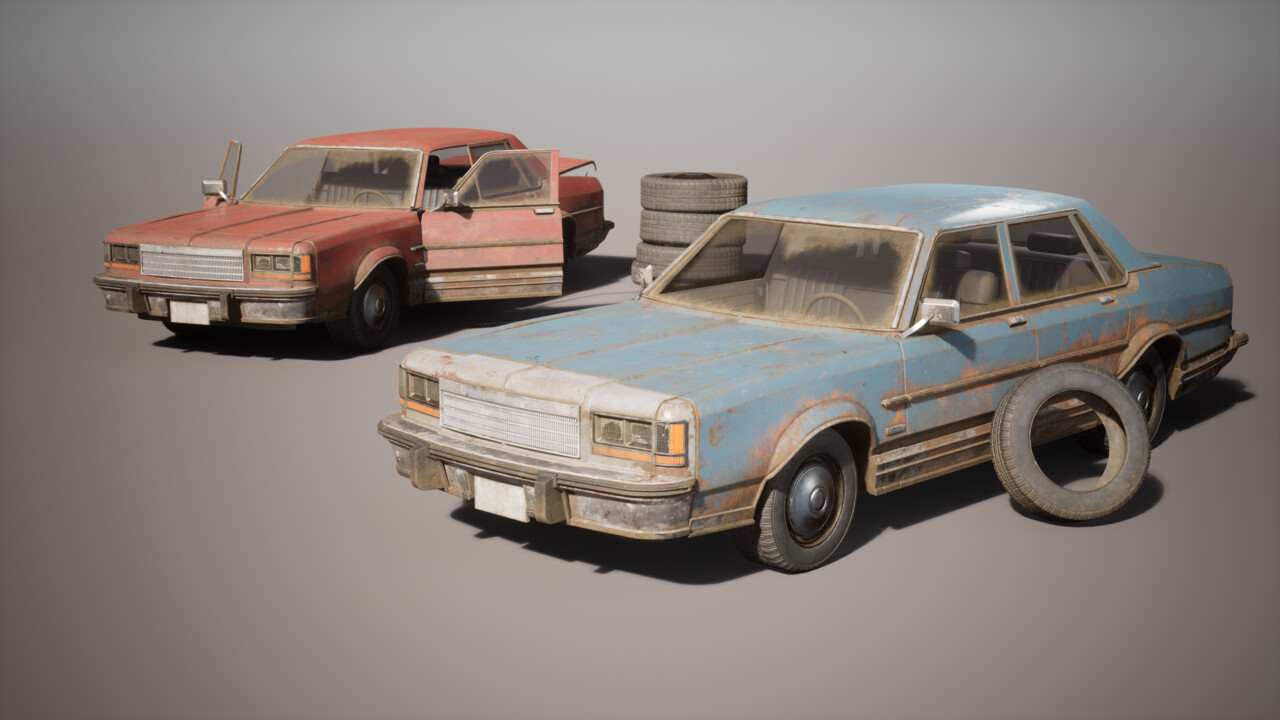
Next, I wanted to create some cars for the scene. It is a gas station, after all. I didn't want the gas station to be from any particular time period, and I have a mix of models and assets inspired by different eras. The overall style of props I was going for is soft boolean merged shapes and rounded forms. This is mainly applied to the props tied to the gas station itself. The more realistic props still have some more square and sharper shapes. 

I originally tried some older cars from the 50s, namely the Ford Consul, but I found the shapes to be a little too rounded and stylised, and it felt a bit too cartoony for the scene. Ultimately, I settled on the Ford LTD, manufactured between the '60s and '80s. It still has some slight roundedness, but it's much sharper overall. I kept it faithful to the reference but adjusted it based on different designs to create a mix I felt looked good. 


Here is the textured version. I also created a mask to allow the vehicle to be colour-tinted. 


I also wanted to create a silhouette variant on the cars so they didn't all look like the same car when I placed them in the scene. I thought I could make a pickup-style version by reusing many of my original car parts. Also, having the colour tinting and the doors and boot being able to open would help give more variants without having to make loads of new cars. 

The pickup was pretty simple. I only modelled a new back section, including the rear fenders, rear window, and tailgate. Everything else was shared from the other vehicle. This created a nice change in silhouette and allowed me to set dress props in the back of the pickup. 

Finally, I worked on the door designs for the Gas station. Again, I took inspiration from many of the shapes in Wolfenstein and Fallout's original high poly work. I wanted these to have a nice, rounded, bevelled look with interesting details while still looking functional. 

The entrance door was supposed to fit the space and conform to the trims underneath. I liked the idea of adding technology on the right-hand side and maybe some more vents or air conditioning above. The same was true for the garage door, except it was just a lot wider. 

I settled on electrical boxes and screens for the tech, plus the air conditioning/vents, as mentioned. Much of this was referenced from real references of similar electrical boxes or switches. I made the entrance door first and then reused many of these components on the garage door. The only unique bits of the garage door are the roller door itself and the vent. 

I also made a quick swinging door for the interior pictured below. 


Here is a shot of some of the assets and details in the game. 

I hope you enjoyed the update

Thanks 
Ben

Gas station - Exterior, terrain and Octopus updates - 07

Work In Progress / 14 August 2024

Hey Everyone, 

After the interior, I worked on some more exterior bits. Starting with windows and trims. 

I first experimented with creating a grimy-looking glass surface. This is a glass Shader with a mask that gives it opacity and roughness variation. As it's mostly in roughness at certain angles, you can see all the way through the glass, and it only tends to be viewable when it catches the light. 


Once I was happy with the glass, I created the window modules. These were modular pieces that snapped together to form the windows' shapes.


I also created modular trims intended to go on the top, underneath and bottom of the walls to add overall detail to the gas station.  

At this stage, I looked at the gas station and wasn't happy with how the Octopus and gas pumps worked together. So, I decided to try a few ideas and experiment with how it all sat together. 

This was the idea I ended up settling on. Keeping the weight of the Octopus on top and the supporting structure relatively thin to allow for breathing space and balance in the environment. I liked seeing through to the rest of the environment and not blocking the view to the distant mountains too much.

It was based on a Gas station I found online in Slovakia, the Atelier SAD gas station. I just really loved the shapes in this. 

Next, I felt I needed to spend time on the terrain and forecourt sections as they weren't very functional. I started with a new blockout for the forecourt, just working out the positioning of the pumps and the logic of how cars would drive in and out. Figuring out the materials and the different spaces. 

I wanted the landscape and the forecourt to mix a bit with soil and foliage creeping into the asphalt. Making it feel unused and rundown, so I also worked on blending the material and placing some foliage in these areas


I added puddles and dampness to the blend so I could get even more variation. 

I replaced my blockout road texture with a proper texture and added a grunge map and road lines. The road lines are temporary placeholders that I created in Designer. 

After this, I created a few more assets that allowed the forecourt to function. The first was a curbstone trim I could run around the gas station. The actual asphalt floor sits flush with the road, but there is a step between the terrain and the asphalt that I needed to fill. I also wanted to have a modelled drain properly cut in as I started to switch the project fully to Unreal 5. 


Gas stations also have many covers and drains. There are specific-shaped covers that allow people to access the gas pipes and workings underneath. I made the models below to give me a range of different covers I could place across the forecourt. 


As they have depth, I also needed to devise a solution to cut them into the ground. I wanted this to be real-time, though, so I could move the drains around if need be. So, I decided to use mesh distance fields and opacity to create a shape that feeds into the material. This creates a hole in the material, and I can move my drains around quickly. It's essentially a cheap boolean solution. 

I also needed to make a few assets that helped bring all the far-distant terrain stuff together. Barriers and assets that could separate different areas. 


Here are some of those working in the environment. 

Next up was the terrain and distant mountains. I used Gaea to create rocky mountain ranges that I could convert to static meshes to swap out my placeholder mountains. These were Mesa-style ranges with rocks and foliage baked into them to simulate the foreground detail. 


I also updated the terrain in the foreground to create some surrounded low rocky outcrops to bed together the near and far detail. Here is how this looked at this stage. I placed the foliage using the procedural foliage volumes, and the material blending came from the masks that Gaea generated. 

Next up was the Octopus. I started by creating a new blockout. I wanted the octopus to feel like one of those giant signs you see. On highways or sometimes shop fronts. Sinclair Gas also has a dinosaur that provides some nice inspiration. As it was large, I wanted to make sure it had construction seams and looked like it was pieced together in parts. 


I created this by splitting it into a head and tentacles. I blocked out the shape in Zbrush for the head using Zspheres. I made a straight tentacle for the tentacles, placed splines where I wanted to position them, and deformed that mesh along the spline. 


I created a proper Zbrush pass for the final model, which I baked down. Still, the head is unique, and the tentacle section is straight. I applied a macro normal map to the model. As this is such a large asset, I used a layered shader to texture it. 

Now, he is textured and finished. Again, he is a bit grimy, which I will tweak later. 

This is how it was all looking at this stage. With all the updates. 

For the next update, I will show a big prop push I did when I was out of work for a few months. 

Thanks 
Ben 

Gas station - Interior work in progress - 06

Work In Progress / 12 August 2024

Hey Everyone, 

I know updating this project has been slow, but I always have multiple projects on the go at once. I am very close to finally being able to call this project complete, and I wanted to post a few blog updates to bring me up to the present. I think I have done about 6/7 other projects in the timespan of this environment, but now it's time to finish this beast. 

Now, the end is in sight. I am currently working on the final couple of assets and polishing the scene as we speak. So, more updates to come! 

The last time I wrote a blog for this, I had just finished redesigning the look of the gas station, mostly shape-wise, as it moved a little bit too far away from my original intent. 

Next, I started fleshing out the interior some more — just getting the structure in there, working on the trim sheet, and a few tiling materials. 

I also made some props, starting with this bar stool. Which was a fun little contained asset. 

I worked on material for the floor, which is a checkered tile. At this stage, I still was going pretty hard on the abandoned theme, so it has moss and a lot of grime (which I change at a later date) 

Before Unreal came along with 5.3/5.4 and its material tesselation, I also experimented a bit with POM and contact shadow solutions to get some depth on the floor, which, considering there is no actual depth, is pretty convincing. I always felt like shadowing was missing from POM, so this helps sell it. 

This was how things were looking at this stage.

I also worked on the walls, doing a pass and adding tiling materials, trim sheet sections and dirt decals. 


I used the same techniques to detail out the roof. I created a base plastic material that I could use to drive the plastic panels on the walls as well. 

Here is a bit more polish on the tiling plastic panels 

and that same material applied in the scene. 

Here is a first pass on the chair for the chairs and tables I have in the interior.


I also worked on the booth and lights. Initially, they were pretty grimy and mossy, which I later decided to change. 

Here is a snapshot of some of those assets and materials in the scene. 

Here is a screenshot of the interior as a whole and how it was shaping up at this stage. 

Thanks for checking it out. Keep an eye out; I will post some more updates soon. 

Thanks
Ben 

Eco - Bot Beetle High Poly Shots

Making Of / 25 January 2024

Hey Everyone, 

I just wanted to provide some supporting images of my beetle project that didn't make it to the final Artstation post. They were also used for marketing material for the CGMA website to show the tutorial and class. I am looking forward to teaching everyone in class! 
https://www.cgma.video/

These are mostly shots of the high poly model before I made the nanite mesh, textured, rigged and animated it. 

Enjoy! 

Ben 

Gasstation - Blockout finished and rework 05

Work In Progress / 19 March 2023

It has been a while since I did an update on this project. I picked it up again after a good break away. In that time, I have worked on an Artstation competition, a collab project and another personal project, so I don't feel too much art guilt. 

I won't lie. It's a challenging project, but I am determined to finish this monster. 

This is where we left off...


Since that, I have worked on foliage, grasses and bushes. I posted this as a separate project on Artstation and wrote a few articles detailing my learnings and process. 

After the foliage, I tried to establish different times of day for the scene with a wider 21x9 shot. I knew I wanted to have four different setups. The primary rainy sunset mood from the concept, Sunrise/set golden hour, hot midday sun and either night/overcast style shot. Four shots together seemed to make sense to me for presentation purposes. 

When I returned to it, I started looking at the destruction, trying to imagine what I could do to try and show a more abandoned setting. I wanted to get a damaged roof where it had partially collapsed, breaking down the top into modular pieces and creating a slight tilt to the roof itself. 

From here, I left the project alone and had a break to work on the other projects I mentioned above. I dipped in and out of the project for a while. Often I would have 2 or 3 projects on the go at once, so progress was slow during this period.

When I finally wrapped everything up and returned full-time without distractions, I knew I wanted to rework my gas station style. I wasn't happy with how square everything had become. In my art bible and style guide, I wanted all the props to feel rounded and bevelled, similar to some of the sci-fi designs you see in games like Wolfenstein or Fallout. Those games have always been a visual inspiration for me. I created a fallout-style project in the past. I looked at doing a pass to bevel and round out the shapes similar to those games. Fallout has an excellent gas station called the 'Red rocket' station. 

I also thought it would be cool to implement the octopus into the gas station more. 

Below is the progress once I have fleshed things out a bit more.


At this stage, I also tried different arrangements for the octopus. I got some advice from friends about which designs were working best. I tried the octopus' tentacles forming the support pillars, wrapping around them, or isolated to the top. 

In this version, I had a connected roof which was a bit of a rip-off of the red rocket station; it felt too close to that design, so I decided to split it. The negative space worked better for my design, especially as the octopus on top is pretty heavy. 

I also redid the interior. The interior was initially blocked out as a service shop for the gas station, but I felt the aesthetic was crying out for an old 50's style diner. So here is where I left it previously. I wanted to have it boarded up and overrun by infection. So the robot is inside exploring. 

The theme is still the same. Overrun with infection (although this isn't in the shot yet), except now it will be an old diner instead. Here is the shape of the new blockout for the building 

How the blockout was taking shape at this stage for the inside. I was also inspired by some of the forms inside Dex's diner from Attack of the Clones. 

That wraps up much of the blockout; if you made it this far, thanks for reading. In future posts, I will show some of the progress on the interior creation and outside of the building, which is much closer to completion now. 

The whole scene is much further along than these blockout shots, but I haven't been great at updating the blog. 

Peace out
Ben

Games Artist Robot Beach Trash Article

Making Of / 28 July 2022

Hey Guys,

I wrote an article to share my workflows with my recent collab project - Robot Beach Trash. Had a blast writing the article and figuring out what parts to include. I wanted to teach others about my workflows and experience working in collaboration with Justin. Hopefully, I will have some more info to share on the project soon as well :)

You can find them all here.

https://gamesartist.co.uk/robot-beach-trash/
https://www.artstation.com/artwork/6bgxww
https://twitter.com/GamesArtistUK/
https://www.facebook.com/GamesArtist/
https://www.instagram.com/gamesartistuk/

Mentorships - Experience Points

News / 09 March 2022

Oh Hello, 

Just wanted to let you know that I am now going to be offering one on one mentorships through Experience Points. You can check out my page here if you wanted to see more.

https://www.exp-points.com/environment-art-mentorship-ben-keeling

It will be great to be able to teach all aspects of environment art and very much looking forward to getting to interact with everyone. It's been an amazing journey for me teaching Substance workshops and classes through CGMA and I am really excited to be able to also delve into all aspects of environment art as well.

If you want to know any more details or have any questions just let us know in the comments section below.


Thanks
Ben

Experience Points Podcast

Making Of / 02 November 2021

Hey Guys,

I recently did a podcast discussing the artstation competition with Experience Points. Had a lot of fun chatting with the guys :) 


GDD Podcast

General / 25 March 2021

Hi Everyone, 

Had a blast chatting with Alex on the GDD podcast. Check it out if you can :)


Listen on Spotify ⯈ https://open.spotify.com/show/7spDMpMZJ9dr3Ziu8bRwCA
Listen on SoundCloud ⯈ https://soundcloud.com/gamedevdiscussion
Listen on iTunes ⯈ https://podcasts.apple.com/gb/podcast/game-dev-discussion/id1459400002
Listen on YouTube ⯈ https://www.youtube.com/watch?v=w42pSBbFLv0

Thank you :)
  

Learning Blender - Add Ons

Tutorial / 02 June 2020

Add Ons 

Add ons are where the real power of Blender comes in. Similar to scripts or plugins in other software, in Blender an add on is a zip file that contains new tools. They are commonly accessed through menus, pie selections and shortcuts. A community of people contribute to a wide range of different tools for Blender and in most cases these make the program more expansive and powerful. As they are just a zip file they are always a simple one click install.  

Below is a list of add ons that I use regularly. I have dropped a quick description for each one below and a link. Worth checking on different stores as the prices vary and often there are sales on certain add ons. This information is valid at the time of posting and work with the latest version of Blender.

Also worth noting that I actually didn't touch add ons until I was comfortable with the base tools. I think it's worth doing that so you are comfortable with the Blenders toolset first.Currently I find that a lot of add ons I pick up to solve gaps in where Blender is missing certain features, a lot of this comes from experience and personal preferences in modelling. However, as time goes on I require less add ons to solve these problems and my list of commonly used plugins gets shorter. This is what is great about Blender. It is ever growing and evolving and if a feature is missing the community requests it and it often finds it's way into the software. 

Modelling add ons 

HardOps and Boxcutter - Paid

Probably the biggest game changer for me. Hard ops is bunch of tools activated by pressing Q. It is a workflow change to make using Blender easier. Boxcutter is a boolean tool where you can draw cutters in the view port and on the models to perform quick boolean operations. It's so extensive it has it's own documentation and YouTube channel where Masterxeon1001 details the workflow. 

EdgeFlow - Free 

Edge flow was a small plugin I found that allows you to do a 'flow connect' operation. This was something I missed from 3DS Max and allows you to connect while taking into account the smoothing of an object. Perfect for increasing the amount of divisions on cylinders and ensuring it stays smooth. 

MaxVis_Tools - Free

This tool has a bunch of useful shortcuts and features. The main reason I got it was for 'super smart create' which is a script I was used to using in Max. It binds lots of useful actions to one key; such as connect, bridge and weld verts. I missed that functionality in Blender and MaxVis was a good way to get it back. 

MeshMachine - Paid

Mesh machine is an amazing tool that can be used to perform a variety of operations. I mainly found it useful for things like unbevelling edges. It comes with a library of plugs which can be snapped to the surface of your model and meshed perfectly together while fixing smoothing. Decal Machine is also another plugin made by the same team. I didn't use it much because I often want to model the geometry into the surface for baking. 

QBlocker - Free

In 3DS Max there is a setting called 'autogrid' this allows you to draw primitives out from the surface normal of an object. This was a small plugin that adds primitives to the shift + A menu and allows you to draw shapes on the surface normal of other objects. I believe in the new version of Blender there is a new primitive that solves this issue.Perhaps in the future this add on might becomes less useful, but for now it solves the problem until Blender releases a new version. 

Asset Management - Paid

A handy little tool that allows you to build up an asset library which you can organise. What I really liked about this tool was you can create an asset and it will create a nice render of it when you add it to your library. For quickly building a kitbash library of pistons, canisters and high poly bits it's perfect. It also comes with a free set of bolts. 

Pivot Transform - Paid

This is another essential tool for working in Blender. The pivot transform tool means I can easily align the pivot to faces, snap it to the bottom of objects. Easily transform it wherever it needs to go. A really useful little pie menu for easily snapping the pivot where you need it. Now I am used to using it I wouldn't be without it. 

Blender for Unreal - Free/Donate 

This add on is a great add on for exporting collections or static meshes. Setting up collision and exporting animations for use in Unreal. It has a great checker to make sure your meshes work and don't have any issues 

UV Add ons 

Texel density checker - Free 

Simple texel density checker. Found it useful for setting texel density on assets that I wanted to export into Unreal. You can also do this in tex tools and other uv plug ins as well. 

Textools - Free 

Tex tools is a classic. Used in 3DS Max for a long time and it has a bunch of useful UV shortcuts. In Max I mainly used the texel density options, different uv grids and flatten uvs by smoothing groups options. 

UVToolkit - Free

UV toolkit is another great add on with a bunch of handy shortcuts for doing common uv operations. You can use it to align uv shells and also enable uv sync, which means you can work in the 3d view on your object and in the uvs at the same time. This does work in Blender as default but this makes it more streamline. 

UVpackmaster - Paid

Another paid plugin but worth the money if you don't want to do any UV packing. It runs the algorithm until it finds the best solution with smallest percentage of wasted space. Very much like Ipackthat but built directly into Blender.

Included in Blender

These are add ons that ship with Blender but are not enabled by default. You can just hop into the preferences add on menu to enable these without downloading anything. 

Tools

Loop, bool, mesh, edge, curve tools are all add ons that you can enable to give you extended functionality within their respective sections. Just search 'Tools' under the add on menu. Though it's worth saying I don't use these all that much and a lot of plugins such as Hard ops/Maxvis have their own shortcuts for these functions. 

Extra Objects

There are a few different add ons which opens up extra objects in the shift + A menu. Just search 'extra objects' in the preferences under add ons. This gives you more primitives to work from in Blender. Assets such as gears and pipe joints, or extra curves. This makes the menu more cluttered but I personally prefer to have more primitives to work with. 

F2

Another standard tool that should probably just be on in Blender by default. It turns the f key into a handy tool for filling polygons and doing handy functions. 

Modifier tools 

Again similar to the F2 function I think this should just be enabled by default. It allows more control over the modifier stack. You can expand and collapse all the modifiers and apply them all at once. Just super handy for keeping on top of all your modifiers.

Copy Attributes 

Copy attributes allows you a more expansive copy menu. It allows you copy different things between 2 or more objects. This can be options such as the objects location, scale or rotation. You can even copy modifiers using this as well. 

Edit Linked Objects 

Recently I discovered that linking and appending files in Blender allows you to reference Blender files into existing files. You can do this with all aspects of the files too like collections and materials. If you enable this add on it means you can edit the linked file and in one click jump into the linked file to edit it. Then you can click the same button to go back to the original file and everything auto saves as you go.


All images are copyright to the original authors.